Showing posts with label WIP. Show all posts

29 May 2019

Warbringer Nemesis #12 - Armor or Structure?

So yesterday I sort of intimated that that blog post would close out the upper torso.  I lied.


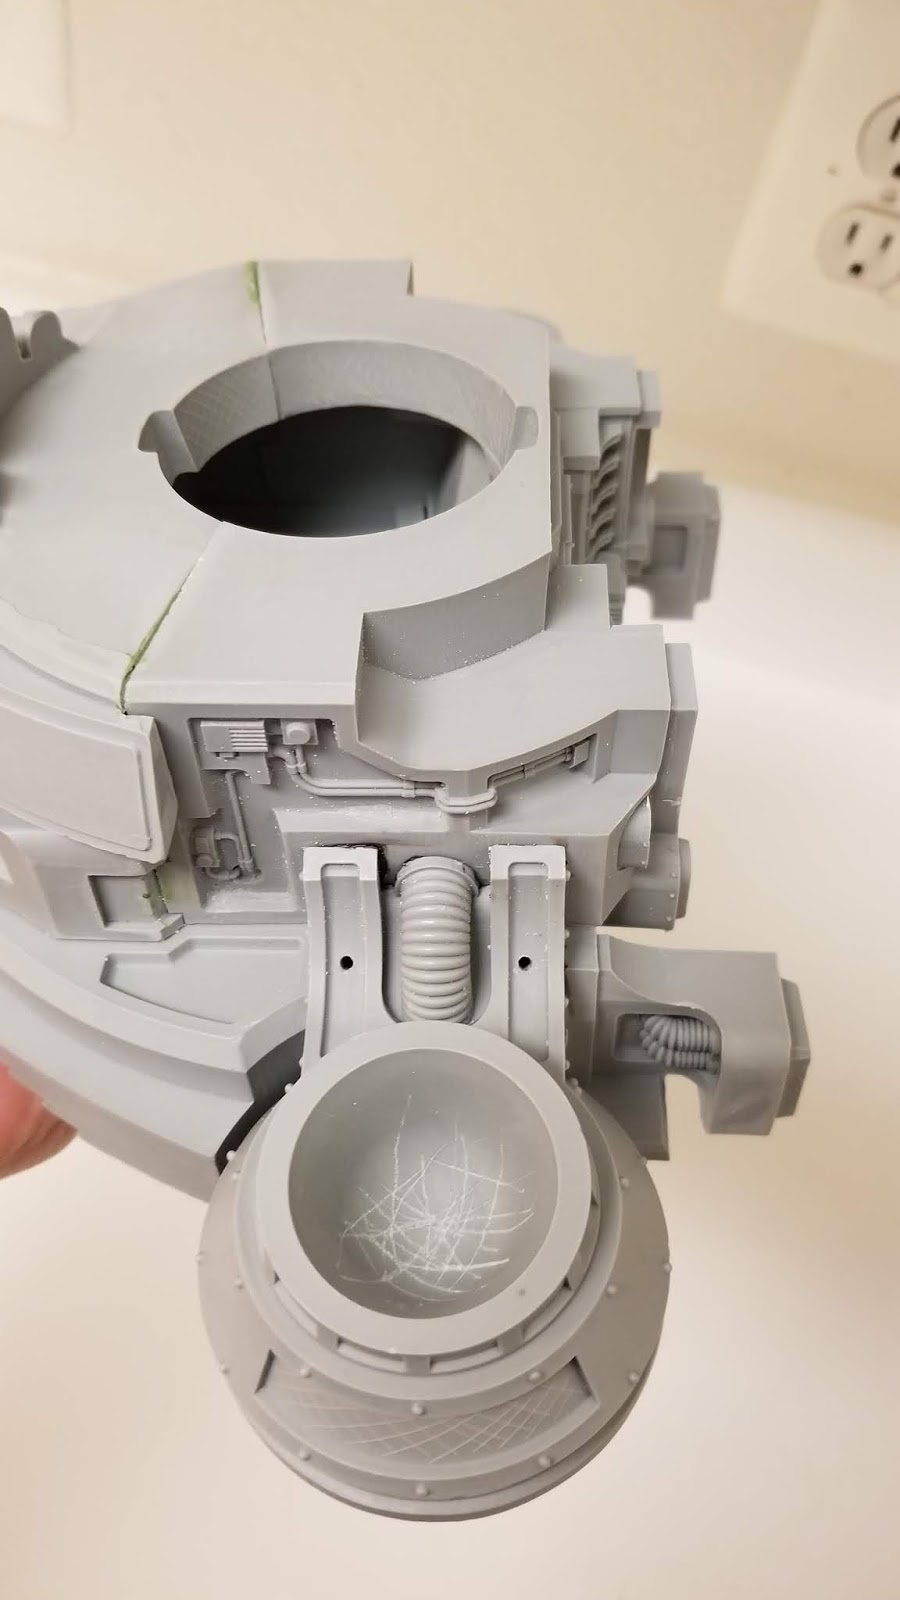
Because I neglected to talk about these.  See those two mechanical bits being held on by the clamps?  Behind the shoulders?

They actually went on pretty easy with JB Weld and some pinning for good measure.  If they were just superstructure through and through, we would not be talking about them much.  But these pieces are among the few-but-extant pieces in the Warbringer kit that are neither 100% superstructure nor 100% armor.  And that means I had a tough call to make about whether or not to leave them off for painting purposes.

The pieces themselves form the part of the Warbringer's hull that the Void Shield generators attach to.  On the underside they have standard issue mechanicus aesthetic gubbins.  On the top they are covered in the same kind of trimmed armor plating that makes up most of what your eye is drawn to on any Titan.  


I love being able to paint armor pieces separately on kits like this.  It makes painting the metal bits so much faster, and keeps me from cross-pollinating metal paints and not metal paints.  Which is important because the flecks in metal infect everything on my workstation.  Especially my brushes and rinse water.  

Now, the attachment points for these pieces are fine and if they were not hanging off the torso on a place I was very likely to grab I would have just left them off and glued the assembly together after painting.  But because they are pretty much the first thing I grab when handling the upper torso I opted to JB Weld them in place.  Then I pinned them for good measure. 


I am pretty sure that is a 1/8" pin. Drilled diagonally into the strut from the deck piece.  I covered this in green stuff afterwards, then sanded.

I would have much preferred if these were in two pieces with the armor plating separate from the mechanism.  

Actually, there are more pieces to these which I did leave off because I thought their connection was less fragile and because when glued they would make it hard to access some of the armor and trim here that will still be visible when the Titan is complete.


Those pieces.  I did glue the hoses in place.

Okay, well, that is almost the whole upper torso.  There are still the railings to talk about, but I did those much later.  So I will talk about them later.  They should be one of the last things you put together anyway because they are so fragile that once they are on the Torso you have to be careful how you handle it. 


28 May 2019

Warbringer Nemesis #11 - Titans In This Blog Post May Be More Complete Than They Appear

So, when I did my last real post back in the beginning of April I said that the torso was pretty simple but I would talk the parts that were tricky.

Honestly, that magnets thing really nailed it.  Like, that was largely what was tricky.  The torso is kind of... boring.  But in a good way.  I have heard horror stories of people building Warhound titans having to use plasticard and green stuff just to get the stock-standard torso to fit together.

Sometimes those difficulties actually inspiring more modding and kit bashing because, hey, if you have to go through all this trouble anyway then why not doe something exciting?  Which can have cool results, but is kind of frustrating when you are talking about a kit that runs north of $500.

I actually used to appreciate that kind of "problem" in the old Tau Crisis Suits (circa 2001 - 2015).  They were decent models.  The concept of something was there.  But in their unaltered configuration they just lacked something.  They were static.  They were flat.  If you were building a commander you needed some way of distinguishing that model, and it was not going to come from the box.

There was a time during 4th and 5th edition when the Tau were just terrible on the tabletop, and one of the jokes within the Tau community was that you played Tau specifically to kitbash battlesuits.  And the community came up with some great things!

A confluence of factors changed that starting in 2013.  The release of the Riptide and the 6th edition codex upped the competitive game of the Tau, so new players were not necessarily daunted by the prospect of losing many/most games.  The release of the new crisis suits in 2015 was final nail in the coffin for the high percentage of modded crisis suits.  Mostly because the new crisis suits look good.

Sure, this decade has brought a revolution in 3D printing to the avid crisis suit modder, but that portion of the community seems to be much smaller.  There is a price and skill gate that exceeds the old "cut stuff up and see what works" methods of the last decade.  And now that the kit looks so good, it is hard to use cutting and green stuff to achieve effects that look as-good-or-better than the suits out of the box.

Anyway, that is a really roundabout way of me saying that the Warbringer is more like the new Tau suits in that respect:  it is a well designed kit that that mostly just works.  I say mostly because there are a few design choices that I think probably seemed better in concept than they work out in execution (like the dreaded handrails), but they are really the exception here.

So the last time I was talking about the build in general, and not magnets specifically, I was talking about putting together the upper part of the torso. And I was really close to finishing that honestly, so here it is:


Placing the shoulder sockets on the upper torso.  The slots for them are well defined and they go on pretty much without a hitch.  I glued them on one by one.  I mean, there are only two of them.  But I did not glue them on together.

As you can see above I used three clamps.  One to hold the socket cup, and the other two to pin down the structural supports that hold it to the torso.  It was a little tricky to get the clamps on those in place because they curve and taper.  Like so:


See how the bottom (well, top in that picture, but the piece is being held upside down) of those beams curves and angles in?  Sort of tough to get the clamps on.  But just fiddle around with it and it will work.  Oh, and I used standard JB Weld for this.  You want strength here because these pieces will hold the weight of the weapons.

You can also see two small holes in the structural supports above.  I drilled those for pinning.  I believe those are 1/8" holes.  Something in that ballpark anyway.  After I inserted brass rod I greenstuff them over.  That was a bit tricky here because the fact that the holes sit in those little gulleys made them hard to sand down afterwards.  Fortunately they are small and fairly well hidden once the Titan is fully constructed.  

I also drilled that hole through the top with a 1/4" bit.  The combination of pins angled against each other is really going to keep these sockets on the body for good.  

From there you will start building out the arms.  Take the upper arm pieces and socket them into the shoulder:


You should dry fit the joint with the arm weapon facing and angled the way you want before you commit to this.  It is just about the hardest dry fit in the world because you are talking about dry fitting a weapon that weighs more than most models into two joints that move in different ways.  SO.. sort of try it and eyeball where the elbow plate is in your desired configuration before you glue.  Than try to match that when you glue.  Err towards the weapon pointing out from the body and down.  If you get a titan that looks a little rested it will still look better than one where the gun is pointed up and toward the center of its body like it is waving or wiping sweat off its brow.

Also, you can see that I used four clamps there.  I did these pieces one at a time.  The clamps on the left side (your right) are only for balance.  I wanted to do this while the torso was on the legs so I could approximate pose.  If I only clamped the one side it would have fallen apart.

This is what the operative clamps looked like:


Tension between the clamps keeps the piece from angling too far in one direction or the other.

Also, it looks like I glued the pistons into that piece already.  I think you can figure out how to do that.  It is really very easy.


 Drilled a hole in the attachment point for the shoulder armor for pinning.  I did not even need to green-stuff this over because it will be covered by the plates when finished.  Rod is 1/4".

Next up the elbows:


Easy!  Watch the angles though, they look bad angled too far in either direction.  

And that completes the arms.  Although obviously not their attendant weapons.


25 April 2019

Warbringer Nemesis #10 - A Very Special Magnets Issue

One of the most common questions I see about the Warbringer in the Warhammer 30/40k community is what kind of / how many magnets do you need to build it.

Of course, you do not need any magnets to build it, but magnetizing options can give you a lot of flexibility.  Flexibility in loadout, in pose, in transportation options, etc...


When magnetizing miniatures you almost always want to use rare-earth magnets.  I understand that neodymium magnets are the most common of these.  A lot of times they also have a strength "grade" associated with them.  You want to look for some with a grade between N-42 and N-52.  I like to get N-52s when I can, but a lot of times I cannot source the sizes I want in strengths greater than N-48.

I get my magnets from Apex Magnets.  They are close to me so shipping is super fast.  I have only had a few dud magnets from them, too.  Another option is Magnet Baron.  I have met the Baron, and he is a good dude who makes a lot of useful add-ons for Games Workshop kits.  He also has options for packages of magnets that specifically correspond to some common kits.  Unfortunately, the Warbringer is not common enough to warrant one of those.

I am not a complete "magnets for everything" band-wagoneer.  Often I prefer not to use them because I do not like how they get jostled when you move models around on a table.  [Side note:  That concern was born of my introduction to magnets on Tau battlesuit weapons, which (when magnetized) do not really recess into the model at all and are easy to mis-orient or shake loose when playing.]

There are two distinct instances in which I do like to use magnets:

  1. When a model comes with pre-molded slots for them, suggesting that the kit was designed with magnets in mind. (I.e., Adeptus Titanicus Warlord Titans)
  2. When a kit is so expensive that I would not reasonably ever have multiples simply for the sake of having loadout options. (I.e., the Acastus Knight Porphyrion)
The Warbringer Nemesis meets both of these tests.  It comes with quite a few pre-molded magnet recesses and it is so expensive that I am not reasonably going to have more than one just to represent different loadouts.

The Warbringer is sort of an odd beast when it comes to magnetization.  A lot of components are designed to be magnetized, but some very important ones are not (or do not have adequately sized recesses).

Here is a list of all of the magnets that you need (or, at least, what I used) and what they correspond to:

  • Magnets for Pre-molded Slots:
  1. 12 - 8mm x 2mm - Anvillus-pattern Batteries, Quake Cannon Ammo Feeders
  2. 28 - 6mm x 2mm - Anvillus-pattern Batteries, Quake Cannon Ammo Feeders, Head
  3. 12 - 4mm x 2mm - Quake Cannon Ammo Feeders, Head
  • Magnets which I drilled holes for:
  1. 2 - 20mm x 10mm - Torso / Legs
  2. 1 (per weapon) - 15mm x 5mm -  You want one for each arm weapon, so probably 2 initially.
  3. 2 - 10mm x 5mm - Arm Socket
I am 99% sure that those are the correct magnets, in the correct sizes, for the correct parts.  Well, except for 4 12mm x 2mm magnets I placed in pre-molded slots on the Quake Cannon's vertical rotation axis.  Those did not work out very well, though, and I ended up gluing those pieces in place in the end to save myself trouble.

Also, slots exist for the 4mm x 2mm magnets which connect the head cables to the torso assembly and which connect the Quake Cannon's ammo feeders to the torso assembly.  They are not strictly necessary (although I did account for them in the list).  Other magnets in the neck socket and the ammo feeders do an ample job of holding those respective pieces up. 

In fact, the 4mm x 2mm molded recesses in the torso assembly for the ammo feeders are incredibly finicky to place magnets in.  Or at least, it is hard to do so in a way that preserves the right polarity.  They are so close that even if you are very careful about polarity, they can hop up and reorient before the glue sets.  I had that happen to both sides of my Warbringer's torso.  I had no choice but to remove them at that point.

You might ask yourself, "how does one remove magnets which have been superglued into place?"

Well... this is how:


You drill the magnets out through the back.  Which means you better hope that whatever is on the backside of those magnets is not a bit of detail that will get destroyed.  The chewed up mess of holes you see here will end up (and as of writing, have ended up) being covered by the shoulder assembly.  

The reason it is a chewed up mess, rather than a single hole, is because I was eyeballing where the bit would come out.  Also because I broke a drill bit in the resin and had to drill around that to remove it.  It was a nightmare.  I would never put those 4mm x 2mm magnets in the ammo feeders again.  I included them in the list because there are slots for them and if you get it right they do work.  

The other topic I would like to spend a minute on are the added magnets, those which ForgeWorld did not include molded recesses for (or those which I judged to be inadequate).

The torso and waist have molded recesses built in, but I honestly do not even remember what size they originally were.  At any rate, they were not going to be sufficient to keep the legs attached to the torso when lifted.

Now, the torso actually sits on the legs very well without any magnets.  


No magnets were installed between the torso and waist in that picture.  And I could jostle Romach Shel Raam around a bit like that too, the torso would stay on.  What I could not do is lift the whole titan by its torso or tilt it very much while carrying it by the legs.

So I decided that I wanted magnets.  Lyden Procter of the Titan Owners Club had already built his Warbringer and had demonstrated magnets that held the legs on.  I asked him what magnets he used, and he said 20mm x 10mm.  That is a pretty big magnet.

In order to mount them I had to drill some pretty big holes.  Thing is, a standard 20mm drill bit would have left a pretty big depression beneath the magnet and made it harder for the magnet to stay glued in place.  So instead I researched my options and found something called a Forstner bit.

The Forstner bit was patented by Benjamin Forstner in 1886 to drill a smooth sided hole with a flat bottom.  For big magnets, especially a 20mm diameter magnet, it is what I wanted.  I got this one off of Amazon. 

It drilled this hole:


Oh, yeah, you need a power drill to do that.  I used a hand drill to create a pilot hole, and probably spun the Forstner bit by hand for a little bit to make sure I had the hole in the right place, but once the hole guides were set I used a power drill.  There is a lot more resistance when drilling, really "shaving," this kind of hole, so you have to be patient.  It also throws off a ton of resin flakes and dust, so you must wear a respirator or something like that.

The 20mm magnets that go in here and in the torso are powerful.  I have not let them touch each other, because I do not think that I could separate them if I did.  That has to wait until they are firmly glued in place.

The battle titan arm weapons, which work for both Warbringer and Reaver titans, have some variety.  More than any other option currently available for the Warbringer.  So it is really appealing to magnetize them. Unfortunately, the arm weapons do not come with molded recesses.  The elbows have built in recesses where a guide peg on the weapon plugs in.  I think they are something in the ballpark of 8mm in diameter and 2mm deep.  I felt the weight of an arm weapon and decided that I was not comfortable with the pull force I would get from an 8mm x 2mm magnet.  

That meant that the elbow recess had to be expanded in order to get a strong enough magnet in there.  I opted for a 10mm x 15mm magnet and I used a 10mm Forstner bit to drill the hole.  I really needed the Forstner bit there because there was not a lot of resin behind the elbow mount.  Even with the Forstner I drilled through the shallow parts of the elbow's piston trenches on the opposite side. Fortunately, when everything was said and done, the pistons and the arm assemblies hid the spots where the bit came through.  

For the weapons themselves I used a 15mm x 5mm magnet (one for each weapon).  I have one Melta Cannon, one Gatling Blaster, and two Volcano Cannons.  I had drill the 8mm guide peg away and then drill down into the weapon's body in order to mount the magnets.  I probably could have gotten away with a normal bit here, but again I used a Forstner.  I just really love having that flat bottomed hole to drop magnets into. Much less frustrating than a normal bit.  The smaller the magnet (or the taller where height is greater than diameter) the less necessary the Forstner bit is.

Oh!  One more thing: Glue.  I set most of my magnets with Maxi-cure superglue.  For most applications it is enough.  For magnets over 10mm I use Gorilla epoxy.  Superglue can be pretty brittle, so anything where one big magnet is going to be subjected to the force of me removing and replacing parts I prefer the epoxy.  It is overkill for small magnets though.

And that is a wrap for today's very special post on magnets.  Let me know if you have any gripping magnet questions!

[Note:  Will Hayes told me that I had 6mm x 1mm magnets marked where it should have been 6mm x 2mm.  I recall making a change in recommendation to another Facebook TOC group member in early march where I said 6mm x 2mm and then altered that to 1mm based on something I saw at home.  Maybe I picked up my 6mm x 1mm magnets and thought that is what I used?  I will double check on this and get an answer tonight.  Will Hayes is definitely to be believed here though.  In which case, I apologize for steering anyone wrong.]


02 April 2019

Warbringer Nemesis #9 - The Torso - a Nice Solid Build

This barely counts as a post.  Building this section of the torso was strikingly easy.

You take the two rectangularish parts of the Warbringer and glue them together.


I used Gorilla Epoxy for this.  It is not as strong as JB Weld, but this piece is so thick and has so much contact surface and will bear weight evenly that I decided it was not necessary.

I did fit the lower piece of the upper torso in its socket while glueing these pieces, but I did not glue it in.  It is just there to make sure they pieces dry in a way that does not interfere with assembly later on in the process.

I also decided I had better do the same thing with the top of that assembly - the Warbringer's upper platform deck.


Again, that is just sitting up there.  It is not glued in.  Not yet.


Once that was dry I glued the upper deck in place.  This time I removed the Quake cannon's turntable.  Honestly I probably could have done this step with it in and not risked glueing it in place.

Gorilla Epoxy here too.  

At this point in time the build became easier.  The legs have to be done juuust right.  Much of the torso only goes together one way.  There are a couple tricky parts that I will go over in a later post.


15 March 2019

Warbringer Nemesis #8 - Standing on Its Own Two Feet

I originally tried a different name for this post.  But it sounded dirty, so I changed it to this.

So, at this point I have both legs completely built, so it is time to attach them to the waist.  This, for me, was when I really started to feel like I had a Titan on my hands, instead of just bits and promise.

Started off by placing the Warbringer's waist piece on my Dremel Drill Press.  I originally bought this to drill level, even holes in thick resin pieces, but it did not work so well for that because the pieces themselves are not flat.

It did, however, work great for holding that waist piece.  The place where the Dremel tool goes formed a perfect cup for the waist to sit in and I was able to adjust the height as I pleased.  The only downside was that I could not get the legs to sit flat on the press's own platform, so I had to swivel the head around where it was unbalanced.  I solved this issue by placing a nice heavy ziploc container I was using to de-grease some other resin pieces on top of the platform.  Balanced.  See my results below:


I smeared some JB Weld on the inner (larger) part of the waist tube assembly and then placed it on the inside of the waist's socket.


I carefully wedged a toothpick in there to make sure the piece set centered in the socket.  Say that five times fast.  Oh, and I probably used a level stick balanced on top of the waist to make sure it was level.  We will see a picture of that later.  

Hot tip:  Levels only work if the table you are working on is also level.  That did not bite me too badly, but it definitely altered my finished pose a bit.


This is what the assembly looked like while setting.


And after.  Oh, you probably noticed I did both sides.  Yep.


At this stage I pinned the assembly with 1/4" brass rod.  I drilled diagonally up through the tubing into the waist piece.

Also, why are these pieces styled like... what... tube insulated joints?  Same thing on Imperial Knights and I am never sure how to paint it.  Matte black like it is rubberized?  Steel like it is metal?  I honestly just lack a good sense of what the designers were going for here.  Ultimately you will barely be able to see it on the completed Warbringer, but I am still curious.


Next I glued the legs onto the assembly, making sure to distress them first for better adhesion.  Remember, we are doing this for every part we glue.


Also remember, for this stage you want to make sure that the leg rotation ring is on the waist assembly before you glue the legs in place.  The instructions remind you, but I actually put this together without it first.  Fortunately, I was using JB Weld and it was maybe a minute before I noticed, so it was not a problem.  If I had left it to sit, though, I would have been one sad panda.

Note:  The rings are just hanging freely on the assembly at this point.  Once the legs are in place I will glue them so the pistons connect to the legs in a reasonable arrangement.


And there is the whole assembly with a level on top of it for verification purposes.  It actually turned out alright despite my wonky table.  

The armor plates here are either dry fitted or held on with white poster tac.  

And that is all for today.  Tune in next time for the start of:  The Upper Torso!!


01 March 2019

Warbringer Nemesis #7 - Pinning the Femoral Head


Short Post today.


I was going to do something longer on putting the whole pelvis/waist assembly together, but I decided that first I should go into some detail about how I pinned the tops of the Warbringer's "femurs."  And that information would make the pelvis thing too long.

The Warbringer's femurs are similar to that of a Reaver Titan's in that they are primarily a series of pistons.  In the Reaver's case, one large and two small.  For the Warbringer, two large and one small.

These pistons, now and in all future references just for the Warbringer, are molded into the knee joint and the top part of the femur as shown in pictures below:


These pieces have pretty decent surface area coverage for glue, but I decided that they should also be pinned because they will carry a lot of weight, and bear a minor jolt every time I put the upper torso onto the legs.

I achieved this by pinning each of the three pistons.  After I glued them with JB Weld of course.


 For the front piston, I drilled a 1/8" hole diagonally up the piston into the socket.  Not all the way into the socket though.  Although that would have been okay too.


Like so.  I chose the 1/8" rod for this pin because the front piston is going to be mostly covered up by the Warbringer's armor plate.


That will totally cover up the hole!

Next I drilled a 1/16" hole in the rear piston.


I chose a smaller size pin this time because the rear piston will remain visible, so I wanted the hole to be fairly unobtrusive.


This time I did accidentally drill all the way up into the socket.  It was fine though, all of this is going to be sealed in by the hip connectors.  Or pelvis connectors?  Titans are not totally human shaped.


I drilled a 1/16" hole in the inner piston as well (there is no outer piston).  This piston is molded to the upper socket, so I drilled down into the knee joint here.


Then it was a simple matter of inserting sanded brass rod coated in thick super glue, waiting for that dry, and filling the holes with two part green epoxy.

I failed to document that step.  But it really is very simple.

Come to think of it, we have not really discussed two part epoxy, or green stuff (okay, sometimes it is green stuff).  I use the Army Painter stuff because the last time I ran out was around a NOVA Open and the Atlantis Games and Comics booth had that kind.  It works fine for me, but I cannot comment on its quality versus other variants.

There are a lot of guides for using green stuff out there, so for the time being I am not writing one.  If anyone is interested in that, I can.  If I think about useful tips while I am detailing this build, I will let you know.  Right now, I have none.

15 February 2019

Warbringer Nemesis #6 - Leg Daze

When building a multipart model kit it is best to do some test poses with it before you start building to make sure your intended pose works right. 

I have no the hell idea how to do this with something like a titan.  It has so many pieces and many of them are heavy.  You can use sticky putty, but to deal with something as big and heavy as a titan you need to use enough of it that its volume interferes with your sense of how a final pose will look.  A few millimeters of putty here and there can really throw off your visual test run when compared to the final product.  Additionally, the putty is not really strong enough to hold the weight of a titan even when generously applied.

The upshot of all this is that you need to do some dry fitting, but a lot of posing is a matter of eyeballing smaller parts of the assembly section by section. 

That is how I built up the legs of #168.


The pictures above are not in the best layout, but they show roughly how I started building the feet into the legs.

My first step was to score the ball joint on the calf/ankle piece and the well in the foot so that my bonding epoxy would have a better surface to grip to.  You can score pieces with a hobby knife or a scribing tool.  It will wear out the blade on a hobby knife pretty fast though.

If your surface is too smooth, then it is possible for an impact to create a clean separation between the glue and the piece it is adhered to.   

There are design reasons, namely multiple points of distributed contact, why this is not as much of a problem in the finished Warbringer design.  But I am not taking any chances.  Also while I am building and painting it, it will probable only be attached by the main ankle joint.

Once that was done I mixed up some JB Weld, applied it to the ball joint (the ball, not the well) and put it in place at roughly the angle I wanted.

This was tricky because it is hard to gauge the exact angle that will work best for the finished titan and because JB Weld takes a long time to set.  I would say in my experience the better part of 8 hours.

I did a few things to help me achieve what I was going for here.

First, I dry fit the pistons into the leg armor.

Oh... shoot.  This reminds there was a whole other step in here.  I had to glue the piston covers on the armor.  Which covered up the etched part notifications as to which piece of armor was for which leg and where on that leg it was intended to go.  So I scribed "RF" for Right Front and so forth for each armor piece so I would not mix them up later.

I did this on the back of each piece so that when they are glued on the marks will not be visible.

The pistons themselves are part agnostic, so I just shoved them in.

Then I gently laid them on the assembly to make sure I was not gluing at angle which would render me incapable of attaching these pieces later on.  A real challenge with any titan larger than a Warhound at any scale.  I swear the toe piston armor pieces on this, Reavers, and Warlords just exist to ruin the most dynamic poses.  This part of the assembly makes me miss the hell out of T'au suit ankles.  Oh Ta'Unar... how I remember the simplicity of glueing your foot on.
 
This also sort of supported the ankle piece during its long drying time.  But not very well.  Because I was gluing at an angle where the calf was leaning back and inward, I was able to prop my handy Citadel Mouldline Remover up  against the piece to stabilize it and make sure it did slide further back than I wanted.

When that finally set I glued the pistons into place with Gorilla Epoxy.  This stuff is significantly weaker than JB Weld, but notably stronger than super glue.  It also sets much faster than JB Weld, at an advertised five minutes. (Although I find it often takes just a bit longer than that to be strong enough to safely handle).

This makes it perfect for gluing pieces that are not going to bear a lot of weight necessarily, but which require a little bit more setting time than super glue to position properly.

Also, if you overdo it you can clean off excess with a toothpick for a few hours application.

Just be sure to properly mix this stuff.  It can be hard to get a good 50/50 mix out the syringe type applicator.  I usually dispense it onto the top of a surplus plastic condiment cup and mix it with a popsicle stick or a bamboo party fork.  Then I will apply it with said stick or fork, and use a toothpick when I need more fine application control.
 
When that was finished I pinned the foot to the ankle with 1/4" brass rod.  You want to use brass here because it is not magnetic, does not corrode, and can actually be cut with wire cutters without breaking your hands and sending steel missiles hurtling across your living room.

I mention all those things because I used to pin with steel rod for the strength, but it is totally overkill and causes problems with each of those things.

Sometimes I use 1/4" rod and sometimes I use 1/8" rod, depending on how big a piece is and how much strength I need.  Generally I will use the 1/4" rod whenever I can physically drill that size of hole without messing up the model. 

I used to drill pinning holes before I glued pieces, but I have found that then I was sort of locked into a position that was based more on how well I drilled holes than how I actually wanted my model to be posed.

The method I use now, which I believe I based on a Forgeworld guide somewhere (possibly the working with resin pamphlet that comes in Forgeworld kits), is that I glue pieces first.  Then, once the glue is set, I drill a hole through those pieces in as much of an angle as I can get without marring any surface detail.

You want to either pick a totally flat panel to do this or a surface that is eventually going to be covered up another piece glued on top of it.  If neither of these is available then just choose the least obtrusive and visible spot on the final model.

I drill holes with either a pinning vise or a battery operated power drill, depending on what I am working on.  The pinning vise is usually preferable because it offers more control and avoids heating up resin.  If you start to screw something up with a pinning vise you can stop very quickly because chances are you were already going fairly slow.  This mitigates damage.
 
Sometimes, though, you need to drill a fairly long hole through big, solid resin pieces.  For example, when you are building a Titan.  And a pinning vice just feels like torture for this kind of work. 

I did use a power drill for the pins on the legs. I had to be very careful when I did so, using a variable speed drill on fairly low speed (it was a manual trigger pull) and removing the bit from the resin frequently to pull resin shavings from it and to prevent the resin from overheating due to the friction from the bit.  Otherwise you can get the bit stuck in the resin.  Sometimes they come out after that.  Sometimes. 

I know I usually like to link to the tools I am using, but I cannot do so for either the pinning vise or the power drill.  I have many pinning vices, and they are at least 6 years old.  Many of them are more than a decade old.  So... you know... you can probably find something better now.  And what I have probably is not on the market anymore.

My power drill I actually bought fairly recently, but I bought in *gasp* a real physical store.  I was at Home Depot and we bought it for home repair kind of jobs, not as a hobby tool.  It was only later that I discovered its applicability for this work.

The only reason I bought this particular drill was because it was the second cheapest drill Home Depot had, and they could not find an undamaged box of their cheapest drill in store.  My spouse was very displeased with that.  I know it is a Ryobi, and that is about it.

Anyway, I usually use a bit that is just slightly larger than the rod I intend to use in order to drill the hole so that I can insert a cut rod to full depth when it is covered in super glue.  Which also covers my next stage in the process.  I use either gorilla glue cyanoacrylate or Bob Smith Industries Maxi-Cure for this.  Honestly, I recommend the latter.  Not that there is anything wrong with the gorilla glue.  Just, man.. that Maxi-Cure is really good.


After that I will cover the hole in green stuff.  Wait for that to set.  Then sand it flush with the resin.

I repeat this process as I move up the leg.  Using epoxy to set the knee joint, then pinning it.  I follow this with the thigh piece and the hip.  For the connections between the knee and the calf, and the thigh and the knee I do not need to cover up my pins with green stuff because when I glue the following piece in the sequence it covers up my pinning hole.


Where possible, I use my Irwin quick grips to put pressure on the epoxy bond as it sets in order to strengthen it.

I also dry fit the armor pieces on as I move up section by section to make sure that the pose I am getting with the superstructure still looks good fully armored.  The contours and lines of the armor versus the superstructure are sometimes different enough that what looks good for the "skeleton" does not work for the final armored piece.  It can be subtle, but noticeable enough to drive you nuts.


There is a picture of the completed right leg, next to some Imperial Knights from House Chesapeake and a little Death Guard assault marine for scale.

30 January 2019

Warbringer Nemesis #5 - The game is a foot!

I know, I know.  I have been spending a lot more time building than blogging.  And so I am way behind.

Fortunately, I am such a slow builder that this has not really burned up a lot of important blog posts in terms of how a build works structurally.

That is because the way that I glue legs takes a long time.  I mean, I could probably do it faster, but I am gripped by a fear of ruining my model kit with a wonky looking leg pose.  The more expensive the kit, the worse my paranoia.  So a Titan was pretty much ground zero for me freaking out over a stilted or awkward leg pose.  (The other upshot of this is that I am almost painfully conservative in the poses I select, it is easier to screw up a bold or interesting pose.)

Today, I am going to focus on the very foundation of the leg pose, the mundane foot!

So first, I have to do a little housekeeping, and you should expect to do this on any resin model.  When you cut the gates off, you will leave marks on the piece where the gate used to be.  My multi-stage method which I detailed in post #4 does a pretty good job minimizing that, but there is usually something.


As you can see in the picture above, I am set up to sand rough spots off of #168's foot.  I have a respirator here to protect myself from the resin dust.  I know resin dust is dangerous and, I believe, carries some cancer risk.  Although I do not know anything about the specifics of that risk, or if my protection is adequate.  Generally people recommend a lot more basic dust masks for this, and the respirator is more robust by comparison.  I actually just use it because I find it tremendously more comfortable than a dust mask, and it does not fog up my glasses.

Next I have a cup of water.  Now, you may or may not have cups.  I really hope you do.  If you are building a titan and do not have a cup of any kind, then probably that should be your first priority.  Also, the water is tap water.

The small greyish rectangle partially hidden by respirator straps is a metal file.  Here is a set of files I  guess.  It is not what I use, but I have had these so long I cannot remember where I got them.  I have not found them to be a great tool, but they serve their purpose.  I use them to remove the roughest bits of gate remains and to smooth out really bad casting lines.  I like to wet the resin piece down before I begin sanding to limit the spread of resin dust. 

Haha, so the next thing I literally spent fifteen minutes trying to find a link for - the 240/240 grit hobby stix.  They are so stupid expensive for what they are, and I constantly try to find something to replace them that is more cost effective, but cosmetic nail files just do not work like these do.  I cannot work without them, and if I could I would.

These sand down the rough surfaces left behind by the hobby file, or deal with surface imperfections that are too fine to require the file in the first place.  Which honestly, is a lot.  Again, wet the resin down before using.


Anyway, once I was done sanding, I got to gluing.  You cannot glue resin with hobby cement (plastic glue).  The chemical reaction does not happen.  You can glue resin with super glue and that will probably work just fine.

However, I have had superglue crack on me more than once.  For a big, heavy model that is expensive to own and time consuming to build and paint I prefer the piece of mind that epoxy gives me.  There are several kinds of epoxies like JB Weld, and I will use several of them in the course of this build.  For the legs, though, I am looking for strength above all else, so I use original JB Weld.

Here is an interesting video from Project Farm testing the strength of several epoxies.  A lot of this is overkill for what we are doing, but it helped me understand this stuff a little better. 

This stuff smells pretty awful, is difficult to get out of the tubes in the right ratios and takes forever to set (although this has some benefits, like giving you time to make sure you get the correct pose).  But it dries hard as a rock and I have never been able to break a JB Weld bond when properly mixed and applied.

I applied it on the foot and toes of #168 here because the titan is going to spend a lot of time carrying weight on them, and wanted those joints to be strong.


After I applied the glue, I set the toes very gently between these Irwin Quick-Grip clamps.  In retrospect, I am not sure how I did this so effectively here, because when I tried the same thing with the other foot the clamps made the toes curl and I gave up on using them for that purpose.  They will come in handy for building the legs though.


Here is a picture of the bottom of the foot after it the JB weld set.  It is very sturdy (although this picture does not necessarily convey that).

And that is a foot!  I would show you the other foot, but I built it after I finished the right leg, and it pretty much looks the same as this foot.

For those of you in the know, Warbringer Titans come with a single bent front toe so that you can pose the titan in a more dynamic walking pose.  I declined to do this for several reasons.  First, I felt that the titans would be marginally more stable with two whole feet on the ground.  Second, I mocked up some leg poses and asked my wife what she thought, and she said she liked the foot on the ground better.  So I decided to go that way.

I am sure many people will make awesome Warbringers that look much more dynamic than mine, but the pose I unveil soon is the one I was comfortable with.