29 May 2019

Warbringer Nemesis #12 - Armor or Structure?

So yesterday I sort of intimated that that blog post would close out the upper torso.  I lied.


Because I neglected to talk about these.  See those two mechanical bits being held on by the clamps?  Behind the shoulders?

They actually went on pretty easy with JB Weld and some pinning for good measure.  If they were just superstructure through and through, we would not be talking about them much.  But these pieces are among the few-but-extant pieces in the Warbringer kit that are neither 100% superstructure nor 100% armor.  And that means I had a tough call to make about whether or not to leave them off for painting purposes.

The pieces themselves form the part of the Warbringer's hull that the Void Shield generators attach to.  On the underside they have standard issue mechanicus aesthetic gubbins.  On the top they are covered in the same kind of trimmed armor plating that makes up most of what your eye is drawn to on any Titan.  


I love being able to paint armor pieces separately on kits like this.  It makes painting the metal bits so much faster, and keeps me from cross-pollinating metal paints and not metal paints.  Which is important because the flecks in metal infect everything on my workstation.  Especially my brushes and rinse water.  

Now, the attachment points for these pieces are fine and if they were not hanging off the torso on a place I was very likely to grab I would have just left them off and glued the assembly together after painting.  But because they are pretty much the first thing I grab when handling the upper torso I opted to JB Weld them in place.  Then I pinned them for good measure. 


I am pretty sure that is a 1/8" pin. Drilled diagonally into the strut from the deck piece.  I covered this in green stuff afterwards, then sanded.

I would have much preferred if these were in two pieces with the armor plating separate from the mechanism.  

Actually, there are more pieces to these which I did leave off because I thought their connection was less fragile and because when glued they would make it hard to access some of the armor and trim here that will still be visible when the Titan is complete.


Those pieces.  I did glue the hoses in place.

Okay, well, that is almost the whole upper torso.  There are still the railings to talk about, but I did those much later.  So I will talk about them later.  They should be one of the last things you put together anyway because they are so fragile that once they are on the Torso you have to be careful how you handle it. 


28 May 2019

Warbringer Nemesis #11 - Titans In This Blog Post May Be More Complete Than They Appear

So, when I did my last real post back in the beginning of April I said that the torso was pretty simple but I would talk the parts that were tricky.

Honestly, that magnets thing really nailed it.  Like, that was largely what was tricky.  The torso is kind of... boring.  But in a good way.  I have heard horror stories of people building Warhound titans having to use plasticard and green stuff just to get the stock-standard torso to fit together.

Sometimes those difficulties actually inspiring more modding and kit bashing because, hey, if you have to go through all this trouble anyway then why not doe something exciting?  Which can have cool results, but is kind of frustrating when you are talking about a kit that runs north of $500.

I actually used to appreciate that kind of "problem" in the old Tau Crisis Suits (circa 2001 - 2015).  They were decent models.  The concept of something was there.  But in their unaltered configuration they just lacked something.  They were static.  They were flat.  If you were building a commander you needed some way of distinguishing that model, and it was not going to come from the box.

There was a time during 4th and 5th edition when the Tau were just terrible on the tabletop, and one of the jokes within the Tau community was that you played Tau specifically to kitbash battlesuits.  And the community came up with some great things!

A confluence of factors changed that starting in 2013.  The release of the Riptide and the 6th edition codex upped the competitive game of the Tau, so new players were not necessarily daunted by the prospect of losing many/most games.  The release of the new crisis suits in 2015 was final nail in the coffin for the high percentage of modded crisis suits.  Mostly because the new crisis suits look good.

Sure, this decade has brought a revolution in 3D printing to the avid crisis suit modder, but that portion of the community seems to be much smaller.  There is a price and skill gate that exceeds the old "cut stuff up and see what works" methods of the last decade.  And now that the kit looks so good, it is hard to use cutting and green stuff to achieve effects that look as-good-or-better than the suits out of the box.

Anyway, that is a really roundabout way of me saying that the Warbringer is more like the new Tau suits in that respect:  it is a well designed kit that that mostly just works.  I say mostly because there are a few design choices that I think probably seemed better in concept than they work out in execution (like the dreaded handrails), but they are really the exception here.

So the last time I was talking about the build in general, and not magnets specifically, I was talking about putting together the upper part of the torso. And I was really close to finishing that honestly, so here it is:


Placing the shoulder sockets on the upper torso.  The slots for them are well defined and they go on pretty much without a hitch.  I glued them on one by one.  I mean, there are only two of them.  But I did not glue them on together.

As you can see above I used three clamps.  One to hold the socket cup, and the other two to pin down the structural supports that hold it to the torso.  It was a little tricky to get the clamps on those in place because they curve and taper.  Like so:


See how the bottom (well, top in that picture, but the piece is being held upside down) of those beams curves and angles in?  Sort of tough to get the clamps on.  But just fiddle around with it and it will work.  Oh, and I used standard JB Weld for this.  You want strength here because these pieces will hold the weight of the weapons.

You can also see two small holes in the structural supports above.  I drilled those for pinning.  I believe those are 1/8" holes.  Something in that ballpark anyway.  After I inserted brass rod I greenstuff them over.  That was a bit tricky here because the fact that the holes sit in those little gulleys made them hard to sand down afterwards.  Fortunately they are small and fairly well hidden once the Titan is fully constructed.  

I also drilled that hole through the top with a 1/4" bit.  The combination of pins angled against each other is really going to keep these sockets on the body for good.  

From there you will start building out the arms.  Take the upper arm pieces and socket them into the shoulder:


You should dry fit the joint with the arm weapon facing and angled the way you want before you commit to this.  It is just about the hardest dry fit in the world because you are talking about dry fitting a weapon that weighs more than most models into two joints that move in different ways.  SO.. sort of try it and eyeball where the elbow plate is in your desired configuration before you glue.  Than try to match that when you glue.  Err towards the weapon pointing out from the body and down.  If you get a titan that looks a little rested it will still look better than one where the gun is pointed up and toward the center of its body like it is waving or wiping sweat off its brow.

Also, you can see that I used four clamps there.  I did these pieces one at a time.  The clamps on the left side (your right) are only for balance.  I wanted to do this while the torso was on the legs so I could approximate pose.  If I only clamped the one side it would have fallen apart.

This is what the operative clamps looked like:


Tension between the clamps keeps the piece from angling too far in one direction or the other.

Also, it looks like I glued the pistons into that piece already.  I think you can figure out how to do that.  It is really very easy.


 Drilled a hole in the attachment point for the shoulder armor for pinning.  I did not even need to green-stuff this over because it will be covered by the plates when finished.  Rod is 1/4".

Next up the elbows:


Easy!  Watch the angles though, they look bad angled too far in either direction.  

And that completes the arms.  Although obviously not their attendant weapons.


14 May 2019

Thank You Games Workshop! - Adeptus Titanicus Terminals Available for FREE Download

Just a short blog post today, and not on my Titan progress.  Games Workshop released all of the extant terminals for Adeptus Titanicus in downloadable .pdf form on Warhammer Community.  To see more, check out the post here.

This is a huge step forward in terms of game accessibility and gives the official stamp to fan efforts to improve the frankly wonky terminal design with magnet boards and other home-brew solutions. 

While the quality of the original terminals, which are made of nice thick card stock, is high - their actual application leaves a lot to be desired.  The cog markers just rest in recess on the card rather than pegging in.  Plus, they take up a lot of table real estate.  Not to mention the fact that before today players had to buy them for each Titan and banner of Knights they own / plan to play (not individually, they came in packs, but you still had to buy them).

All of this was fine before.  It was not the end of the world and Titanicus was still an exceptionally playable and enjoyable game.  I humbly submit that it is the best ruleset the company has produced in over a decade.  Playing with the cards did not ruin that.

But this is better.  Improving something that was not really broken but was less than optimal is a marvelous step forward.  Games Workshop should strongly consider continuing this practice and expanding it to its other products.

And lord knows it will probably help them sell more Titanicus units.  Knights in particular (especially Cerastus Knights), whose terminal cards have always been difficult to obtain, will probably get picked up by some folks who were frustrated by not being able to legitimately field them before due to stock issues.

I do not confuse this move with altruism, it is in Games Workshop's best pecuniary interests to foster the growth of this game and its community.  But the company has been slow to acknowledge that this kind of move can be beneficial, so I am glad to see it take a step in that direction.

* Adeptus Titanicus image is from Games Workshop's Warhammer Community site.  It is used without permission.  If the rights holder desires that it be taken down then it will be.

25 April 2019

Warbringer Nemesis #10 - A Very Special Magnets Issue

One of the most common questions I see about the Warbringer in the Warhammer 30/40k community is what kind of / how many magnets do you need to build it.

Of course, you do not need any magnets to build it, but magnetizing options can give you a lot of flexibility.  Flexibility in loadout, in pose, in transportation options, etc...


When magnetizing miniatures you almost always want to use rare-earth magnets.  I understand that neodymium magnets are the most common of these.  A lot of times they also have a strength "grade" associated with them.  You want to look for some with a grade between N-42 and N-52.  I like to get N-52s when I can, but a lot of times I cannot source the sizes I want in strengths greater than N-48.

I get my magnets from Apex Magnets.  They are close to me so shipping is super fast.  I have only had a few dud magnets from them, too.  Another option is Magnet Baron.  I have met the Baron, and he is a good dude who makes a lot of useful add-ons for Games Workshop kits.  He also has options for packages of magnets that specifically correspond to some common kits.  Unfortunately, the Warbringer is not common enough to warrant one of those.

I am not a complete "magnets for everything" band-wagoneer.  Often I prefer not to use them because I do not like how they get jostled when you move models around on a table.  [Side note:  That concern was born of my introduction to magnets on Tau battlesuit weapons, which (when magnetized) do not really recess into the model at all and are easy to mis-orient or shake loose when playing.]

There are two distinct instances in which I do like to use magnets:

  1. When a model comes with pre-molded slots for them, suggesting that the kit was designed with magnets in mind. (I.e., Adeptus Titanicus Warlord Titans)
  2. When a kit is so expensive that I would not reasonably ever have multiples simply for the sake of having loadout options. (I.e., the Acastus Knight Porphyrion)
The Warbringer Nemesis meets both of these tests.  It comes with quite a few pre-molded magnet recesses and it is so expensive that I am not reasonably going to have more than one just to represent different loadouts.

The Warbringer is sort of an odd beast when it comes to magnetization.  A lot of components are designed to be magnetized, but some very important ones are not (or do not have adequately sized recesses).

Here is a list of all of the magnets that you need (or, at least, what I used) and what they correspond to:

  • Magnets for Pre-molded Slots:
  1. 12 - 8mm x 2mm - Anvillus-pattern Batteries, Quake Cannon Ammo Feeders
  2. 28 - 6mm x 2mm - Anvillus-pattern Batteries, Quake Cannon Ammo Feeders, Head
  3. 12 - 4mm x 2mm - Quake Cannon Ammo Feeders, Head
  • Magnets which I drilled holes for:
  1. 2 - 20mm x 10mm - Torso / Legs
  2. 1 (per weapon) - 15mm x 5mm -  You want one for each arm weapon, so probably 2 initially.
  3. 2 - 10mm x 5mm - Arm Socket
I am 99% sure that those are the correct magnets, in the correct sizes, for the correct parts.  Well, except for 4 12mm x 2mm magnets I placed in pre-molded slots on the Quake Cannon's vertical rotation axis.  Those did not work out very well, though, and I ended up gluing those pieces in place in the end to save myself trouble.

Also, slots exist for the 4mm x 2mm magnets which connect the head cables to the torso assembly and which connect the Quake Cannon's ammo feeders to the torso assembly.  They are not strictly necessary (although I did account for them in the list).  Other magnets in the neck socket and the ammo feeders do an ample job of holding those respective pieces up. 

In fact, the 4mm x 2mm molded recesses in the torso assembly for the ammo feeders are incredibly finicky to place magnets in.  Or at least, it is hard to do so in a way that preserves the right polarity.  They are so close that even if you are very careful about polarity, they can hop up and reorient before the glue sets.  I had that happen to both sides of my Warbringer's torso.  I had no choice but to remove them at that point.

You might ask yourself, "how does one remove magnets which have been superglued into place?"

Well... this is how:


You drill the magnets out through the back.  Which means you better hope that whatever is on the backside of those magnets is not a bit of detail that will get destroyed.  The chewed up mess of holes you see here will end up (and as of writing, have ended up) being covered by the shoulder assembly.  

The reason it is a chewed up mess, rather than a single hole, is because I was eyeballing where the bit would come out.  Also because I broke a drill bit in the resin and had to drill around that to remove it.  It was a nightmare.  I would never put those 4mm x 2mm magnets in the ammo feeders again.  I included them in the list because there are slots for them and if you get it right they do work.  

The other topic I would like to spend a minute on are the added magnets, those which ForgeWorld did not include molded recesses for (or those which I judged to be inadequate).

The torso and waist have molded recesses built in, but I honestly do not even remember what size they originally were.  At any rate, they were not going to be sufficient to keep the legs attached to the torso when lifted.

Now, the torso actually sits on the legs very well without any magnets.  


No magnets were installed between the torso and waist in that picture.  And I could jostle Romach Shel Raam around a bit like that too, the torso would stay on.  What I could not do is lift the whole titan by its torso or tilt it very much while carrying it by the legs.

So I decided that I wanted magnets.  Lyden Procter of the Titan Owners Club had already built his Warbringer and had demonstrated magnets that held the legs on.  I asked him what magnets he used, and he said 20mm x 10mm.  That is a pretty big magnet.

In order to mount them I had to drill some pretty big holes.  Thing is, a standard 20mm drill bit would have left a pretty big depression beneath the magnet and made it harder for the magnet to stay glued in place.  So instead I researched my options and found something called a Forstner bit.

The Forstner bit was patented by Benjamin Forstner in 1886 to drill a smooth sided hole with a flat bottom.  For big magnets, especially a 20mm diameter magnet, it is what I wanted.  I got this one off of Amazon. 

It drilled this hole:


Oh, yeah, you need a power drill to do that.  I used a hand drill to create a pilot hole, and probably spun the Forstner bit by hand for a little bit to make sure I had the hole in the right place, but once the hole guides were set I used a power drill.  There is a lot more resistance when drilling, really "shaving," this kind of hole, so you have to be patient.  It also throws off a ton of resin flakes and dust, so you must wear a respirator or something like that.

The 20mm magnets that go in here and in the torso are powerful.  I have not let them touch each other, because I do not think that I could separate them if I did.  That has to wait until they are firmly glued in place.

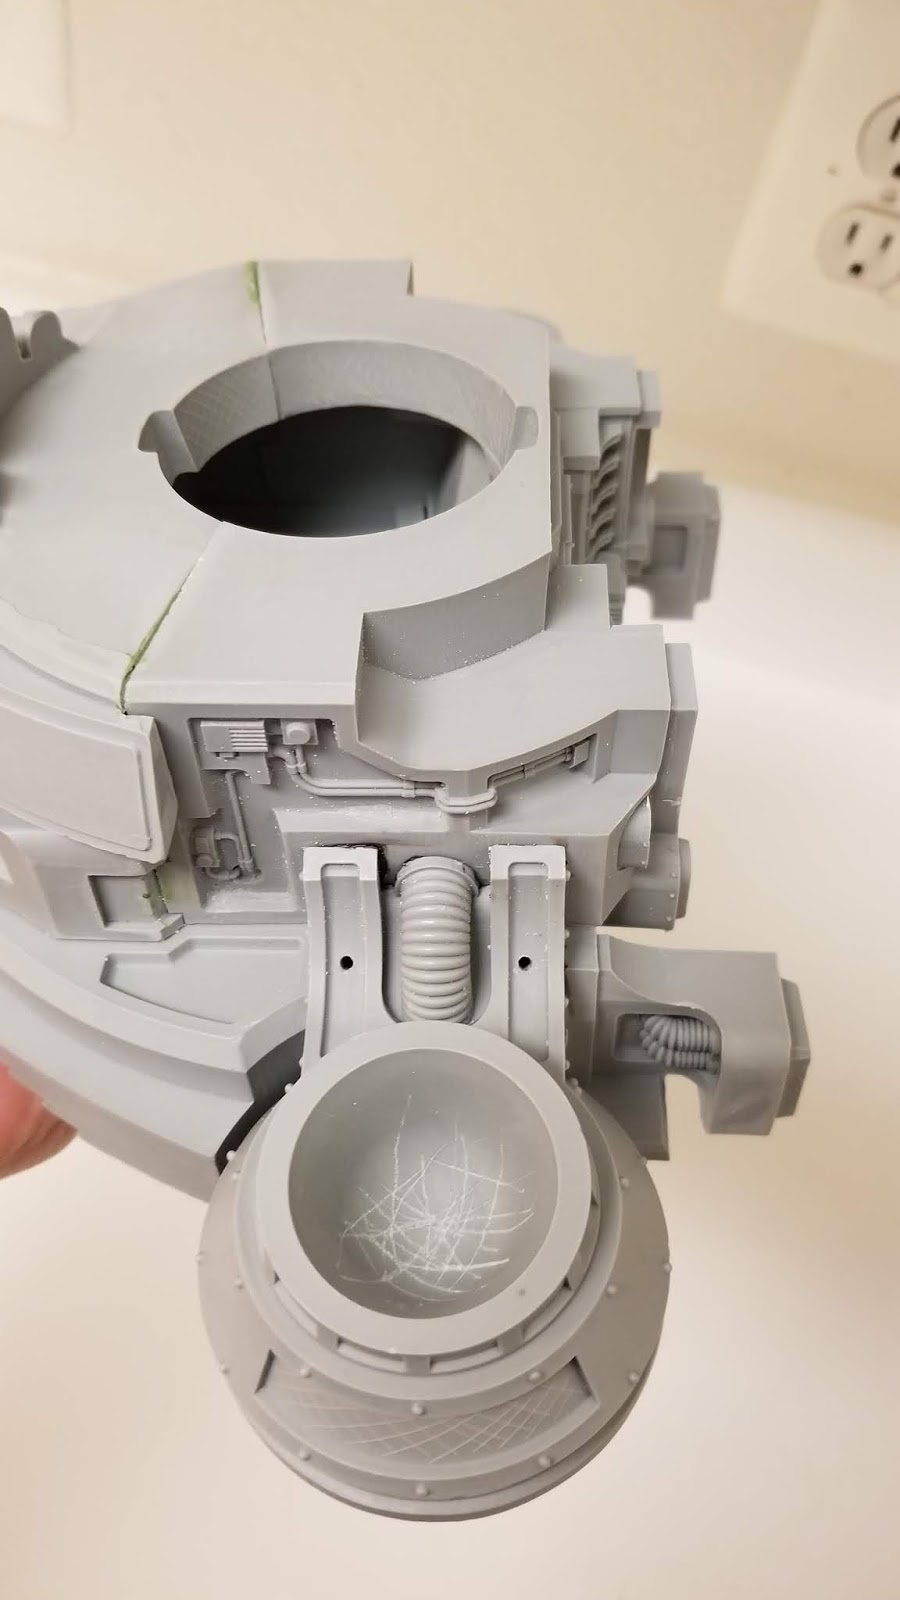
The battle titan arm weapons, which work for both Warbringer and Reaver titans, have some variety.  More than any other option currently available for the Warbringer.  So it is really appealing to magnetize them. Unfortunately, the arm weapons do not come with molded recesses.  The elbows have built in recesses where a guide peg on the weapon plugs in.  I think they are something in the ballpark of 8mm in diameter and 2mm deep.  I felt the weight of an arm weapon and decided that I was not comfortable with the pull force I would get from an 8mm x 2mm magnet.  

That meant that the elbow recess had to be expanded in order to get a strong enough magnet in there.  I opted for a 10mm x 15mm magnet and I used a 10mm Forstner bit to drill the hole.  I really needed the Forstner bit there because there was not a lot of resin behind the elbow mount.  Even with the Forstner I drilled through the shallow parts of the elbow's piston trenches on the opposite side. Fortunately, when everything was said and done, the pistons and the arm assemblies hid the spots where the bit came through.  

For the weapons themselves I used a 15mm x 5mm magnet (one for each weapon).  I have one Melta Cannon, one Gatling Blaster, and two Volcano Cannons.  I had drill the 8mm guide peg away and then drill down into the weapon's body in order to mount the magnets.  I probably could have gotten away with a normal bit here, but again I used a Forstner.  I just really love having that flat bottomed hole to drop magnets into. Much less frustrating than a normal bit.  The smaller the magnet (or the taller where height is greater than diameter) the less necessary the Forstner bit is.

Oh!  One more thing: Glue.  I set most of my magnets with Maxi-cure superglue.  For most applications it is enough.  For magnets over 10mm I use Gorilla epoxy.  Superglue can be pretty brittle, so anything where one big magnet is going to be subjected to the force of me removing and replacing parts I prefer the epoxy.  It is overkill for small magnets though.

And that is a wrap for today's very special post on magnets.  Let me know if you have any gripping magnet questions!

[Note:  Will Hayes told me that I had 6mm x 1mm magnets marked where it should have been 6mm x 2mm.  I recall making a change in recommendation to another Facebook TOC group member in early march where I said 6mm x 2mm and then altered that to 1mm based on something I saw at home.  Maybe I picked up my 6mm x 1mm magnets and thought that is what I used?  I will double check on this and get an answer tonight.  Will Hayes is definitely to be believed here though.  In which case, I apologize for steering anyone wrong.]


12 April 2019

Apex Chelae takes Second Place in Fallout Hobbies Nuclear Winter Contest


Proud that Apex Chelae took 2nd place in Fallout Hobbies' Nuclear Winter poll contest!

Also congratulations to Lemandarin Workshop, Brian Liddell, and Jason Shephard for awards well won!  Everyone submitted fantastic miniatures.


04 April 2019

Titan Owners Club - Romach Shel Raam is live!!

Hey crew!  Some exciting news today.  Romach Shel Raam is live on the Titan Owners Club blog!

In honor of this occasion, for those of you coming from all channels, I would like to share this picture of the fully built Romach Shel Raam with some of its friends from House Chesapeake (plus some errant Imperial Fists and Salamanders).


 As well as this picture of Romach Shel Raam on its own:


Cannot wait to start painting!

But first I will paint up an Adeptus Titanicus Warhound in Legio Hashmallim colors to make sure my color scheme works.

In the meantime, look forward to more build posts.

Be sure to check out T.O.C.'s events survey if you would like to come watch or command these Engines in action!

03 April 2019

Fallout Hobbies Nuclear Winter Contest

Hey Loyal readers, Apex Chelae is currently in the running to win Fallout Hobbies' winter contest.


I humbly submit that I would like your vote for this magnificent knight!  If you are willing to cast a vote, please go here.  Apex Chelae is the 8th entry.  There are still a few hours left in this contest, so please go and vote!

02 April 2019

Warbringer Nemesis #9 - The Torso - a Nice Solid Build

This barely counts as a post.  Building this section of the torso was strikingly easy.

You take the two rectangularish parts of the Warbringer and glue them together.


I used Gorilla Epoxy for this.  It is not as strong as JB Weld, but this piece is so thick and has so much contact surface and will bear weight evenly that I decided it was not necessary.

I did fit the lower piece of the upper torso in its socket while glueing these pieces, but I did not glue it in.  It is just there to make sure they pieces dry in a way that does not interfere with assembly later on in the process.

I also decided I had better do the same thing with the top of that assembly - the Warbringer's upper platform deck.


Again, that is just sitting up there.  It is not glued in.  Not yet.


Once that was dry I glued the upper deck in place.  This time I removed the Quake cannon's turntable.  Honestly I probably could have done this step with it in and not risked glueing it in place.

Gorilla Epoxy here too.  

At this point in time the build became easier.  The legs have to be done juuust right.  Much of the torso only goes together one way.  There are a couple tricky parts that I will go over in a later post.


22 March 2019

The Titan Owners Club Northeast Regional Walk - Recap

So, I have been a bad tech adept.  I have not been keeping you up to date on the actual progress I have made while building #168.  I could have kept going without letting on to this fact, but the Titan Owners Club's (TOC's) Northeast Regional walk happened at Games and Stuff in Glen Burnie, MD.  It was the first time #168 took the field, so I need to show you, of course.

This means that, naturally, the Titan is built.  Or at least built enough to stand on its own in a game.  Lots of pieces are still in sub assemblies.  We will go over that more as I continue to post about its construction, but today I take you back in time to Saturday March 16th, 19M3 (I think that is how to do Warhammer 40,000 dates).


We had a respectable turnout.  You can see James' full Legio Astorum maniple on the left and Jake's Legio Crucius maniple on the right, supported by his knight house banner.  Romach Shel Raam is there, bare, in the center.  You know... ummm... mostly built.  The Warbringer really is a beautiful engine.  A great compromise in size and design between the Reaver and the Warlord.  In front of the Legio Astorum titans you can see my House Chesapeake banner lead by Apex Chelae.


The Walk itself played out as an 8th edition Warhammer 40,000 match.  Only Titans and Knights were present on the field.

The scenario was such each Titan-scale element could walk back on the board when it was destroyed.  Which means Knights could only come back once their whole banner was taken out.

There was some kind of toxic atmosphere rule too that made weapons explode on a 1 or something... but I think we forgot about it most of the time.


The forces in the fight were as follows (I am doing this to memory, and my knowledge of my forces vastly outstrips my knowledge of the forces of my fellow Princeps):

  • Legio Crucius / Legio Hashmallim Alliance
    • Legio Hashmallim
      • Warbringer Titan #168 - Romach Shel Raam
        • 1x Nemesis Quake Cannon
        • 2x Battle Titan Volcano Cannons
        • Compulsory Aux. Weapons:
          • 3x Ardex-defensor Maulers
          • 2x Anvillus-pattern Defence Batteries
    • Legio Crucius
      • Reaver Titan #1721 -  Astramos Mortis Æternem
        • 1x Apocalypse Missile Launcher
        • 1x Laser Blaster
        • 1x Melta Cannon
      • Reaver Titan #??? - ???
        • 1x Plasma Blaster
        • 1x Laser Blaster
        • 1x Gatling Blaster
      • Reaver Titan #??? - ???
        • Do not recall loadout - Princeps Jake had an unfortunate incident that resulted in the armaments of two of his Reavers being left in New Jersey.  I recreated the specifications of #1721 from its TOC entry, but Jake's other Reavers were not there.  One of the unlisted Reavers (above) did have weapons modeled on it, so I counted those.  The other, I simply cannot recall how it was played.
      • Warhound Titan #3305 - Blood of Caldos
        • 2x Turbo Laser Destructor
      • Warhound Titan #3628 - Black Strider
        • 2x Turbo Laser Destructor 
    • House Chesapeake
      • Acastus Knight Porphyrion – “Apex Chelae” – Household #090117
      • Dominus Knight Valiant – “UNDESIGNATED” – Household #060918β
      • Questoris Knight [Gallant Refit] – “Dock Wrecker” – Household #0214
      • Questoris Knight [Crusader Refit] – “Tidal Roar” – Household #050417
      • Armiger Knight Helverin – “UNDESIGNATED” – Household #061118a
      • Armiger Knight Helverin – “UNDESIGNATED” – Household #061118b
      • Armiger Knight Warglaive – “UNDESIGNATED” Household #032618a
      • Armiger Knight Warglaive – “UNDESIGNATED” Household #032618b

Whew... That is quite the list of engines!

Again, I did that to the best of my memory, if someone else can verify those loadouts or titan names, I am happy to update them.  Well, I mean, my memory was aided by the TOC database.


I did not record a play-by-play for this match, because it was not really intended to be competitive.  Plus the walk-back-on rules cut some of the tension in losing a titan.  This was probably for the best though.  Because ... ummm ... Macro hurts.  Most of the titans were killed every turn with so many macro shots flying around.

Fortunately the rules for the scenario were written in such a way that titans came back on a dice roll of 3+... so they came back a lot too.


I think that there is a real argument to be made for the elimination of the macro double damage rule.  It is just too much.  And macro weapons are not exactly hurting in terms of how much damage they can pump out before being doubled.  

Taking down a titan in Adeptus Titanicus feels good.  It takes a significant investment in firepower to do it.  Taking down a titan in 8th edition 40k, with another titan, felt trivial.  I think next time I would play without macro.


Regardless, the game was a blast and was a huge visual draw.  Lots of players and shoppers at Games and Stuff stopped by to inquire about the game, or simply to stare in (sometimes literal) jaw dropping awe at the titans.  

In the end the combined Legio Crucius / Hashmallim forces and their Knight allies won the day, but it was a close game.  


 Titans from largest to smallest! (Yes, yes, the Emperor titan is missing.  Just imagine a person standing on the table.)

Size comparison of the Acastus Knight with a Warhound Titan.  The Reaver in the background kind of baffles the comparison a bit, but you can tell that a Warhound is significantly larger than the largest knight.

I love the Acastus, but honestly if you were only going to get one I would probably go with the Warhound.  Neither is going to see a ton of table time, and Titans just have this awe-inspiring quality about them.  Plus the Warhound is much more viable in the kind of game where you are likely to play one of these.

I prefer the look of the Acastus, but that is really the only selling point I have there.


Take one last look at the built Warbringer, because it will be a while before you see it again.  Next time keep your eyes out for the Torso build.

A big thanks to the Titan Owners Club, James from TOC, and Shadow Wolf for arranging and running this event.  It was a blast and I hope that I will have the opportunity to go to more in the future!


15 March 2019

Warbringer Nemesis #8 - Standing on Its Own Two Feet

I originally tried a different name for this post.  But it sounded dirty, so I changed it to this.

So, at this point I have both legs completely built, so it is time to attach them to the waist.  This, for me, was when I really started to feel like I had a Titan on my hands, instead of just bits and promise.

Started off by placing the Warbringer's waist piece on my Dremel Drill Press.  I originally bought this to drill level, even holes in thick resin pieces, but it did not work so well for that because the pieces themselves are not flat.

It did, however, work great for holding that waist piece.  The place where the Dremel tool goes formed a perfect cup for the waist to sit in and I was able to adjust the height as I pleased.  The only downside was that I could not get the legs to sit flat on the press's own platform, so I had to swivel the head around where it was unbalanced.  I solved this issue by placing a nice heavy ziploc container I was using to de-grease some other resin pieces on top of the platform.  Balanced.  See my results below:


I smeared some JB Weld on the inner (larger) part of the waist tube assembly and then placed it on the inside of the waist's socket.


I carefully wedged a toothpick in there to make sure the piece set centered in the socket.  Say that five times fast.  Oh, and I probably used a level stick balanced on top of the waist to make sure it was level.  We will see a picture of that later.  

Hot tip:  Levels only work if the table you are working on is also level.  That did not bite me too badly, but it definitely altered my finished pose a bit.


This is what the assembly looked like while setting.


And after.  Oh, you probably noticed I did both sides.  Yep.


At this stage I pinned the assembly with 1/4" brass rod.  I drilled diagonally up through the tubing into the waist piece.

Also, why are these pieces styled like... what... tube insulated joints?  Same thing on Imperial Knights and I am never sure how to paint it.  Matte black like it is rubberized?  Steel like it is metal?  I honestly just lack a good sense of what the designers were going for here.  Ultimately you will barely be able to see it on the completed Warbringer, but I am still curious.


Next I glued the legs onto the assembly, making sure to distress them first for better adhesion.  Remember, we are doing this for every part we glue.


Also remember, for this stage you want to make sure that the leg rotation ring is on the waist assembly before you glue the legs in place.  The instructions remind you, but I actually put this together without it first.  Fortunately, I was using JB Weld and it was maybe a minute before I noticed, so it was not a problem.  If I had left it to sit, though, I would have been one sad panda.

Note:  The rings are just hanging freely on the assembly at this point.  Once the legs are in place I will glue them so the pistons connect to the legs in a reasonable arrangement.


And there is the whole assembly with a level on top of it for verification purposes.  It actually turned out alright despite my wonky table.  

The armor plates here are either dry fitted or held on with white poster tac.  

And that is all for today.  Tune in next time for the start of:  The Upper Torso!!


01 March 2019

Warbringer Nemesis #7 - Pinning the Femoral Head


Short Post today.


I was going to do something longer on putting the whole pelvis/waist assembly together, but I decided that first I should go into some detail about how I pinned the tops of the Warbringer's "femurs."  And that information would make the pelvis thing too long.

The Warbringer's femurs are similar to that of a Reaver Titan's in that they are primarily a series of pistons.  In the Reaver's case, one large and two small.  For the Warbringer, two large and one small.

These pistons, now and in all future references just for the Warbringer, are molded into the knee joint and the top part of the femur as shown in pictures below:


These pieces have pretty decent surface area coverage for glue, but I decided that they should also be pinned because they will carry a lot of weight, and bear a minor jolt every time I put the upper torso onto the legs.

I achieved this by pinning each of the three pistons.  After I glued them with JB Weld of course.


 For the front piston, I drilled a 1/8" hole diagonally up the piston into the socket.  Not all the way into the socket though.  Although that would have been okay too.


Like so.  I chose the 1/8" rod for this pin because the front piston is going to be mostly covered up by the Warbringer's armor plate.


That will totally cover up the hole!

Next I drilled a 1/16" hole in the rear piston.


I chose a smaller size pin this time because the rear piston will remain visible, so I wanted the hole to be fairly unobtrusive.


This time I did accidentally drill all the way up into the socket.  It was fine though, all of this is going to be sealed in by the hip connectors.  Or pelvis connectors?  Titans are not totally human shaped.


I drilled a 1/16" hole in the inner piston as well (there is no outer piston).  This piston is molded to the upper socket, so I drilled down into the knee joint here.


Then it was a simple matter of inserting sanded brass rod coated in thick super glue, waiting for that dry, and filling the holes with two part green epoxy.

I failed to document that step.  But it really is very simple.

Come to think of it, we have not really discussed two part epoxy, or green stuff (okay, sometimes it is green stuff).  I use the Army Painter stuff because the last time I ran out was around a NOVA Open and the Atlantis Games and Comics booth had that kind.  It works fine for me, but I cannot comment on its quality versus other variants.

There are a lot of guides for using green stuff out there, so for the time being I am not writing one.  If anyone is interested in that, I can.  If I think about useful tips while I am detailing this build, I will let you know.  Right now, I have none.