Showing posts with label Tau. Show all posts

28 May 2019

Warbringer Nemesis #11 - Titans In This Blog Post May Be More Complete Than They Appear

So, when I did my last real post back in the beginning of April I said that the torso was pretty simple but I would talk the parts that were tricky.

Honestly, that magnets thing really nailed it.  Like, that was largely what was tricky.  The torso is kind of... boring.  But in a good way.  I have heard horror stories of people building Warhound titans having to use plasticard and green stuff just to get the stock-standard torso to fit together.

Sometimes those difficulties actually inspiring more modding and kit bashing because, hey, if you have to go through all this trouble anyway then why not doe something exciting?  Which can have cool results, but is kind of frustrating when you are talking about a kit that runs north of $500.

I actually used to appreciate that kind of "problem" in the old Tau Crisis Suits (circa 2001 - 2015).  They were decent models.  The concept of something was there.  But in their unaltered configuration they just lacked something.  They were static.  They were flat.  If you were building a commander you needed some way of distinguishing that model, and it was not going to come from the box.

There was a time during 4th and 5th edition when the Tau were just terrible on the tabletop, and one of the jokes within the Tau community was that you played Tau specifically to kitbash battlesuits.  And the community came up with some great things!

A confluence of factors changed that starting in 2013.  The release of the Riptide and the 6th edition codex upped the competitive game of the Tau, so new players were not necessarily daunted by the prospect of losing many/most games.  The release of the new crisis suits in 2015 was final nail in the coffin for the high percentage of modded crisis suits.  Mostly because the new crisis suits look good.

Sure, this decade has brought a revolution in 3D printing to the avid crisis suit modder, but that portion of the community seems to be much smaller.  There is a price and skill gate that exceeds the old "cut stuff up and see what works" methods of the last decade.  And now that the kit looks so good, it is hard to use cutting and green stuff to achieve effects that look as-good-or-better than the suits out of the box.

Anyway, that is a really roundabout way of me saying that the Warbringer is more like the new Tau suits in that respect:  it is a well designed kit that that mostly just works.  I say mostly because there are a few design choices that I think probably seemed better in concept than they work out in execution (like the dreaded handrails), but they are really the exception here.

So the last time I was talking about the build in general, and not magnets specifically, I was talking about putting together the upper part of the torso. And I was really close to finishing that honestly, so here it is:


Placing the shoulder sockets on the upper torso.  The slots for them are well defined and they go on pretty much without a hitch.  I glued them on one by one.  I mean, there are only two of them.  But I did not glue them on together.

As you can see above I used three clamps.  One to hold the socket cup, and the other two to pin down the structural supports that hold it to the torso.  It was a little tricky to get the clamps on those in place because they curve and taper.  Like so:
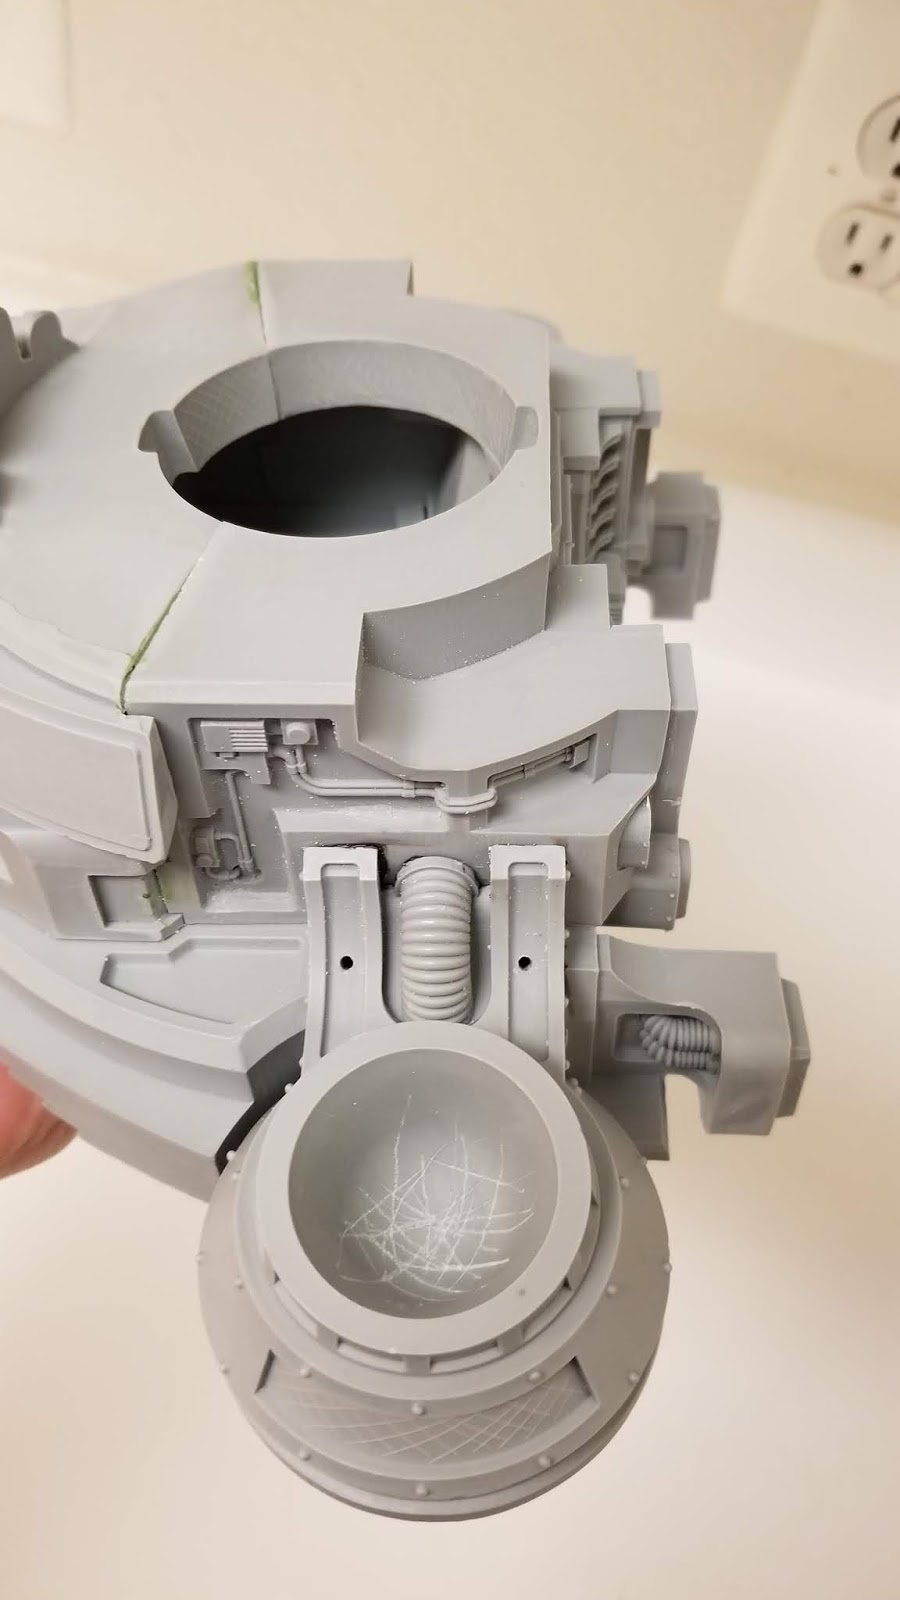

See how the bottom (well, top in that picture, but the piece is being held upside down) of those beams curves and angles in?  Sort of tough to get the clamps on.  But just fiddle around with it and it will work.  Oh, and I used standard JB Weld for this.  You want strength here because these pieces will hold the weight of the weapons.

You can also see two small holes in the structural supports above.  I drilled those for pinning.  I believe those are 1/8" holes.  Something in that ballpark anyway.  After I inserted brass rod I greenstuff them over.  That was a bit tricky here because the fact that the holes sit in those little gulleys made them hard to sand down afterwards.  Fortunately they are small and fairly well hidden once the Titan is fully constructed.  

I also drilled that hole through the top with a 1/4" bit.  The combination of pins angled against each other is really going to keep these sockets on the body for good.  

From there you will start building out the arms.  Take the upper arm pieces and socket them into the shoulder:


You should dry fit the joint with the arm weapon facing and angled the way you want before you commit to this.  It is just about the hardest dry fit in the world because you are talking about dry fitting a weapon that weighs more than most models into two joints that move in different ways.  SO.. sort of try it and eyeball where the elbow plate is in your desired configuration before you glue.  Than try to match that when you glue.  Err towards the weapon pointing out from the body and down.  If you get a titan that looks a little rested it will still look better than one where the gun is pointed up and toward the center of its body like it is waving or wiping sweat off its brow.

Also, you can see that I used four clamps there.  I did these pieces one at a time.  The clamps on the left side (your right) are only for balance.  I wanted to do this while the torso was on the legs so I could approximate pose.  If I only clamped the one side it would have fallen apart.

This is what the operative clamps looked like:


Tension between the clamps keeps the piece from angling too far in one direction or the other.

Also, it looks like I glued the pistons into that piece already.  I think you can figure out how to do that.  It is really very easy.


 Drilled a hole in the attachment point for the shoulder armor for pinning.  I did not even need to green-stuff this over because it will be covered by the plates when finished.  Rod is 1/4".

Next up the elbows:


Easy!  Watch the angles though, they look bad angled too far in either direction.  

And that completes the arms.  Although obviously not their attendant weapons.


19 January 2019

The Backlog

So I let really unacceptable ten days go without posting.  And today I do not have a "real" post either.

I have been letting the photo transfer process part of this bog me down.  Namely, I cannot get pictures from my phone to here as easily as I would like to.  It is a very trivial problem, and yet it persists.

I wanted to take some time today to discuss a very common hobby problem.  Namely:  the backlog.  I do not have any novel solutions to it, I think the ones that exist are fairly obvious, and yet I still get caught in it.  And so do many fellow hobbyists.

For those of you who are not hobbyists, or who do not play tabletop games, the backlog is when you buy more kits than you have time to paint.  For me, I find that I do this when a new release comes out that really excites me.  Even if I do not bake hobby time for that piece into my schedule.  It is, frankly, a waste of money and an inefficient use of time.  But I do it anyway.  Mostly because when I buy that new thing I always intend on making it my priority, then some future things comes along.

I started my tabletop wargaming hobby in early 2001 (I think it was 2001 anyway) with a single booster pack of Mage Knight figures.  Mage Knight, if you recall, was a click-base fantasy wargame (although, really more of a skirmish game) produce by the now Topps-consumed Wizkids.

Mage Knight figures came pre-painted, so I never had a "backlog."  Now, the quality of their paint jobs was just.... garbage.  But I was young and I did not really appreciate that.  They looked cool to me.  Some of them from that era still do, although that might just be nostalgia talking.

You could re-paint Mage knight figures.  I repainted some.  But anything you did not paint was not, by definition, unfinished.

I was introduced to Warhammer 40,000 by a friend in the fall of 2001.  He had just gotten into Blood Angels, and was easily able to interest me in playing.  I have always liked owning physical toys and representations of characters.

I wanted to play a very high-tech army, which in that era of 40k was not really a thing yet.  So I settled on Eldar, because although their theme was more "ancient," they at least had a polished look to them.  I bought a Phoenix Lord Fuegan (which is the same model today, except in "finecast" instead of metal) and primed him black.

I never progressed any further in painting Fuegan, because the next month the Tau came out.  And Tau were very much the army I was looking for.  High tech, optimistic and lots of battlesuits.  So I suppose then you could say that Fuegan was the beginning of my backlog.  But at least he was only one model.

During my teenage years I proceeded to collect four armies: Tau, Necrons, Space Marines and Bretonnians.  I had enough models for each of those forces, in theory, to field at least a basic army.

In practice, I only really painted enough Tau and Necrons to play.  And halfway through painting my Tau I switched paint schemes because I discovered that my initial black and yellow scheme was just too hard to do with my limited skills.  (Obviously, if you have read my other posts, you know by know that I have happily conquered black and yellow with my Legio Fureans Titans).

The Necrons got painted because the basic Necron scheme, especially in those days, was just unbelievably easy to paint.

Everything else I just... did not get around to before I quit playing late in high school to focus on attempting to date and applying to colleges.  So, while I think a lot of that backlog still exists in my parents' basement... I do not really count it as being a standing part of my current backlog.

That started when I re-entered the hobby in 2013 when I bought a Tau Riptide and Tau Commander the day of their release.  I mean, to be fair, those are both painted now.  Somehow I hammered out that commander in just under two months from start of build to finish while also working on the Riptide and relearning how to paint miniatures.

The Riptide took longer.  Much longer.  I would not finish it until March of 2017.  In the intervening years I worked on it and other projects.


Over that time my passions for different projects have waxed and waned.  I have some shining examples of completed work.  Apex Chelae (Acastus Knight Porphyrion) chief among them.  A healthy chunk of my Tau army is finished and my wife's (but you know... let's be honest... my) Adeptus Mechanicus Army is at a fieldable, if not finished state.

I am bound to complete the Warbringer Titan Romach Shel Raam.  Actually, I think this blog is a good piece of accountability for that.  And the same goes for my Titanicus Legios.

But for everything I am making progress on there is something that I built and never primed, or primed and never painted, or painted but never completed to a table ready state.  And when I buy something, that is never the intention.  But shiny objects capture my eye.

I think right now my solution is to be Titan focused this year.  To finish my Titans of all scales at the exclusion of nearly everything else.  (Although I would not mind closing out my extant Imperial Knight projects).

Hopefully one day everything will be painted, as it deserves to be.